Search This Blog

Tuesday, July 8, 2014

Alpine Strawberry Arrivals

My second delivery of alpine strawberries arrived. This time it was a mixture of varieties from The Fragrant Garden.

They were a mixture of healthy and yellowing, some with fruit, and some without. None were named (of course), but were apparently yellow and red creeping and clumping types. And one 'cream' colour (that was just listed as yellow on the label, so who knows what it will be?).

A red alpine strawberry. WITH ACTUAL STRAWBERRIES.

Why yes, it is possible that I did eat the berries
 right after. Why do you ask?

It was very windy and rainy today (we had a strong easterly which is quite unusual - it blew my borage entirely the wrong way and the main stalk is now damaged. There's now an impressive patch of bare earth standing testimony to its mulching abilities). So I only planted out a couple of the strawberries, the rest are waiting in their pots.

 One went in with the Honey Babe peach, another went round the bag under the annoying shady tree that nothing much grows under, and a third joined the previous ones in the apple tree bed (the one with the fruit - one berry fell off as I planted it, so I ate it. And then I ate the other one. Despite the white on the berry they were definitely ripe and absolutely delicious).

Yellow Alpine in Colander
By far the happiest of the plants were the three yellow alpines I bought via TradeMe. They were big, happy, healthy plants and two have gone into the garden, with the third in a nice, big colander. This one also has a flower! 

The flower seems to be bigger than the remains on the smaller ones that arrived today. I'm not sure if this is due to the variety, the size of the plant, or the fact that it's difficult to compare them at different stages in the flower fruit cycle. I guess I'll be finding out!

One lovely strawberry flower...

So sometimes TradeMe gardeners are actually better than nurseries. They cost slightly more, but they were worth it.


But what do they taste like?

Fantastic. I'm trying to find non-cliche adjectives, but 'sweet', 'intense' and 'flavourful' keep springing back up into my descriptions like weeds.

They are like concentrated strawberries. The berry is gone in an instant, but the strength of the taste left behind seems like you just ate an entire larger strawberry. They're slightly sharp and sweet and perfect.

Delicious strawberries...
The yellow and white varieties are supposed to be mellower, or pineapple flavoured, but that may just be the colour affecting people's perceptions (nobody seems entirely certain on the difference). I look forward to blind taste tests. You know, FOR SCIENCE.

Yep. I am extremely pleased with my decision to go alpine-strawberry-mad. I am now going to start collecting them and seeing how many I can raise from seed. This will be difficult, as it involves not eating all the berries.

I don't want to divide them, as apparently the berries get bigger when the plants are bigger. Also, it's apparently easiest to grow them from seed if you just plant the entire berry (as there are multiple seeds, and obviously it's the best environment for them).


Buying the Strawberries

I have seen references in articles to being able to find them in the herb section of garden centres, but most of those articles are three or four years old. I certainly haven't seen any anywhere - though I don't exactly tour garden centres across the country. It's certainly something I'll be looking out for, though.

But so far, my options have been hunting down plants for sale online.

I've only found a couple of other sites that sell them (other than TradeMe), and they are small, difficult to contact businesses (one is a single person, the other has a defunct website and no response to my email). And Subtropica.co.nz, which has white strawberries, but only ships during summer. I wouldn't be surprised if these gardens mostly sell via TradeMe (or in person. But that doesn't help me much as they're often in Palmerston North or even further!).

They're also a lot more expensive than normal strawberries, around five times the price per plant. This is a pretty logical result of their rarity and the relative difficulty of propagating them (runners are much rarer and less vigorous. Seeds are an option, but slow. Most plants are created by dividing clumps after two or three years, which isn't particularly quick!).

Varieties are almost always described just as 'red', 'yellow' or 'white. There may be some confusion between the last two, as some of the product descriptions claim that the yellow variety turns white when ripe. It's possible that they are all "Yellow Wonder" and "White Pineapple" but I have found no authoritative source on that, or a way to tell them apart before you buy anything. They hybridise a lot once they're in the garden though, so they could be anything by now.

With luck, there will also be mention of whether it is clumping or runnering (although that's also dependent on the conditions - alpines can be induced to runner occasionally).


Sources:

Subtropica - Northland, white, ships in summer, $3 per plant

TradeMe.co.nz - variable range and prices. I've got some of my best and some of my worst plants here, but it's a good place to pick up really cheap plants, or unusual ones that are out of stock elsewhere. Or just to diversify your plant stock a bit.

The Fragrant Garden - Palmerston North, five unnamed varieties (yellow/red/creeping/non-runnering), $5.20

Koanga Heritage Gardens - Hawke's Bay, White Pineapple (an actual named variety!, runnering) and unnamed red (nonrunnering). Order by August to be shipped in spring. $12 (unclear whether seeds or plants, and how many of each). Update: I received my strawberries in the first week of September; three small, healthy plants of each type, so $4 each.

Nikau Hill - Palmerston North, problems with website and no response to email when I tried to order, but had yellow and red for $9.90 Update: New website online in Sept, '14

Heavenly Herbs - Wellington, private grower. Red. Contact by email for availability and payment, $5
Haven't tried.

More about alpine strawberries:
Strawberry Store: Alpine Strawberries (US based. Good for information, but can't be shipped into NZ)

Worm Farm is Working

A quick update to confirm that my worms are alive and starting to chow down on a full bucketfull every couple of weeks.

I bought the worm farm just over a month ago, and added the worms maybe three weeks ago. It's mostly full of compost, with a layer of food scraps and then a thick layer of newspaper.
The Hungry Bin
(read about this worm farm here)

I run the odd half bucket of water through it every few days, to flush out the leachate and dissolve some of the good worm castings. This then drains into the tray underneath, which is filled with coconut coir. The coir then expands, turns into magical potting soil without me having to wait and mix it up when I'm actually planting, and hopefully absorbs a few extra awesome nutrients.

The first bucket or so of food I put in, I just sort of hoped it would work. I was definitely overfeeding, even though I was trying to give them time to settle in. I tried to avoid poking around, but checked in occasionally under the newspaper.

The general insect life moved in pretty fast, but I didn't see any worms initially. They had a huge pile of new soil to get used to and plenty of breeding to do, as well as needing to wait until the scraps were decomposed, but I was still a bit worried as I knew there were some food scraps buried in the bin (which can be very bad for the worms when they rot).

But last week I had a look, and there were a couple of worms up on the surface enjoying the rotting veges.

The Ghost of the Melon
So I added a half melon rind, as I'd heard that worms enjoyed those. And did they ever. I found a handful of worms hanging out under it a couple of days later, and all the flesh scraped off.

This week, there's only the wax coating left, like a plasticky ghost.


So along with the melon, I added a bucketful of scraps, mashed up with a trowel (the scraps were about a week old, and I've been adding a fair bit of water along with teabags and coffee, so it was all soft and starting to rot already).


I added a second melon rind yesterday


There's already a worm under it (and some of the flesh is gone, and it's full of bugs).
The whitish plastic looking thing at the bottom is the wax from the previous rind. It's just starting to decompose now (it's edible, so it's safe for the garden). The big white thing next to it is just a badly photographed egg carton.


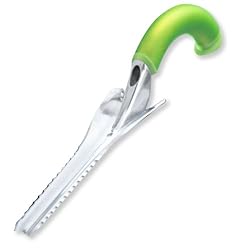
The Radius Garden ergonomic weeder
I know that you can run it all through a processor and things, but I'm a fan of efficiency (plus, my flatmates might revolt). Leaving it to "pre-rot" in a bucket and then chopping with my Radius Garden Ergonomic Hand Trowel seems to work almost as well.

Incidentally, a bit of fangushing over that hand trowel, and its companion weeder. I have carpal tunnel issues, and it is the best design I have ever used. The weeder works fantastically as well for pretty much any weed (including dandelion roots) and the trowel is just a decent all purpose garden tool. The handle design is just perfect and lets you apply very effective, efficient leverage without straining your hand or wrist. They're my two main tools, and I use them constantly. And the curved handle means that I can hang them off a shelf!

Anyway, back to the chopped scraps... 

This seems to have been very popular and has disappeared fast enough that it all looks the same in the bin now (I was adding food to different sections, so that I could see what was being eaten and so the worms could avoid food that they didn't like).

Citrus and onion went in as well, though when we ended up with nearly a bucketful of mandarin peel, I decided to play it safe and added that to the "real" compost bin. I know worms technically don't like acidic food, but from what I've read, it's entirely dependent on how much you give (like any well balanced diet or proper composting mix!). They've certainly gotten rid of the citrus peel so far (though some of the onion skins are still visible).

I also add cardboard and paper, though that's mostly being used to mulch weeds right now!
Hanging out in the mashed up food from a week ago
Banana skins, mandarin peel and pea pods are still visible.


The very first batch of (unmashed) food from three weeks ago. Looks almost the same as
the more recent stuff. Also note a happy compost worm and lots of tiny white wormlike bugs.

So all in all, the worm bin is working well. I can't count the worm population, obviously, but they're still alive. It seems to have a pretty healthy ecosystem, and there are no problems with bugs or smell escaping. I can't harvest any castings for a while, but I'm happy using run off for now, and it should be able to easily handle our small but steady flow of scraps.


Monday, July 7, 2014

Cheap, DIY and Recycled Plant Pots


The little Sublime lime in its DIY wastepaper
bin pot.
If you have a sudden influx of seedlings and small plants, then there are a few ways you can scrounge up extra pots very cheaply.


This is the list of things that I have been doing
  • Recycle all the original pots that every plant you have ever bought came in (obviously!)
    • I had a vast stack of these at one point, as everything I bought went into the garden or into a bigger pot that I had to buy new. Now I've almost run out - and I'm having to find alternatives for certain sizes.
    • I have a lot of tiny seedling sized ones, though. I'm going to try growing individual beetroot and carrots in them!
  • Random plastic containers around the house (just make sure to add drainage as appropriate)
    • E.g. I cut milk bottles in half and use them as seedling trays
    • Any bottle or container can be turned into an actual pot
    • Try planting a seedling or cutting on the lid and put the jar over it for moisture
  • Cardboard boxes outside (will last a while and good for temporary pots, difficult sizes and 'decomposing in place' as very cheap, modular raised beds (complete with readymade mulch flaps!).
    • If you have any interestingly shaped ones such as poster tubes or long boxes you can fill it with soil and cut holes along it, then turn it on its side and plant a row of plants.


    • Cheap stuff from $2 type shops. 
        • E.g. Large plastic bowls and basins (punch holes into them - carefully, the plastic is terrible quality). 
        • Colanders are awesome for strawberries if you can find some with the right design. 
        • You'll often find much cheaper hanging baskets which you can fill yourself with peastraw or newspaper (instead of getting the nice but costlier readymade coconut fibre basket padding).
        • Baskets (e.g. laundry baskets and wastepaper bins) come in a variety of shapes and sizes, have readymade drainage, and often look reasonably nice. Line them with weed matting and you have an extremely cheap air pruning pot.
          • These are ideal for plants that need to drain easily
          • A large laundry basket is usually much, much cheaper than an equivalent sized pot.  

    • Just make a rough 'fabric pot' out of double layered cheap weedmat!
    • Or use a reusable bag (one of those sturdy fabric-ish type ones).
    • Or just plant directly in the bag of compost - an old standby that I haven't actually done yet, because I feel like I'm 'wasting' the compost. But it's cheap (apart from the effort of hauling it home on my bike trailer - a Burley Travoy Bike Trailer , by the way, and absolutely amazing. I can carry two standard bags of soil on it easily).

    Alpine strawberry plant in a sturdy colander.
    If I ever want to hang it, I can easily drill holes in the handles as well!
    Downsides:

    The main downsides to this approach are that some of the containers will degrade quickly or require you to put them together yourself (with room for error creeping in there!).
      Here we have a cheap plastic bowl to catch
      run off (and keep the roots damp, as it's
      Jaboticaba) and an equally cheap wire
       basket with weedmat.
      They may also look pretty ugly.

      There's also the need to know a bit about the plants you're potting, as the much wider than normal variation in containers means that some plants won't do as well if you get it wrong.

      Upsides:

      A great deal of flexibility, both in finding pots and in customising them for the plants and location.

      You can pick containers that suit different kinds of plants (such as large shallow ones for strawberries, tall ones for small trees, basket types for plants that don't like wet feet or that you're trying to keep small and air pruned, easy to hang shapes, small pots, large pots... ).

      Also, CHEAP. And a great way to recycle stuff or create pots on the fly.


      Examples of DIY Containers


      Left: Meyer Lemon in its laundry basket. Self contained, and will drain easily.

      Right: Strawberries. The large bowl at the bag has random slits and holes punched into the base. It's wide and shallow, so great for strawberries - in fact, I haven't seen any proper' pots that shape for sale at all.


         Left: Strawberry Plants.

        • shop bought planters. Nice, but cost five times as much as the other options.
        • cheap planters with pea straw
        • 'proper' strawberry growbag (green, left)
        • a colander (bright green)
        • a random white basket tray with weedmat liner
        • a sort of plastic sieve/colander (dark blue, top)


        Right: Banana Misi Luki. The banana has been very happy in its laundry basket (with weedmat lining). Like the Meyer lemon, it needs to be contained and not get wet feet. This is also going to be easy to move, if it turns out not to work in my garden. But so far, it's doing extremely well.


      Left: Plastic cover for a shop bought cake makes a good tray for a collection of chamomile seedlings in peat pots (being raised for lawn edging and eventual replacement. Vastly cheaper than buying larger plants!)

      Right: Forget-me-not seedlings sprouting in their DIY basket-weedmat container (now large and healthy - the black edging is hidden under a mass of leaves.


      Half a milk bottle makes a great seedling tray! 
      Left: Neglected broccoli seedlings that I was slowly transplanting out

      Right: Peat pots soaking in water before adding seeds (The far left is the sturdiest tray, but means that you can't use the 'handle' half. You can fit the same number of peat pots in both designs (10)


      Left: Another sturdy container with readymade drainage. The broccoli in it is doing fantastically well now (see right/ this post - it's one of the first brocolli batches to flower)


      Right: DIY attempt at a self watering hanging container. Half a bottle with holes inside a hanging container (the frame is from an old lampshade!). The sweetpeas and forget-me-nots haven't grown much, but nor have they died (it doesn't get enough light either - I can't reach the other hooks in that corner!).


       I've also got a few other weird makeshift pots around. I'll update with photos of them some time.


      Sunday, July 6, 2014

      Jaboticaba or Brazilian Tree Grape

      I stumbled across the Jaboticaba by chance. I automatically research any new species I come across to see if they are something I can grow (and actually buy in New Zealand!), and this is one of those weird long shot plants than I figured would be fun to try.

      It has a lot of different names. The species name is Plinia cauliflora (or Myrciaria cauliflora or Eugenia cauliflora)


      It's an interesting plant and rather picky about its conditions - it will grow slowly and happily for years, doesn't really care about the soil type, but won't fruit unless it's consistently watered. But it seems hard to kill outright!

      Because it grows so slowly, it makes a good container plant. It also looks rather lovely. 

      The trees can get pretty huge in their native Brazil, and apparently there are a lot of different varieties there. We only really get one or two in New Zealand (and only one that I was actually able to find), and they generally only grow to about 3-5m here (because it's colder and less humid. It should stay even smaller in a pot - the idea is that you just grow it up then plant it out later).

      They fruit and flower directly on the trunk itself, large purplish grapelike fruit that look really impressive. They're very prolific; you get a lot of fruit off each one and they keep flowering and fruiting up to three times a year (a month and a half between flower and fruit) in the NZ climate. Four times if you're somewhere warmer. The fruit is good to just eat, or to make wine or jam out of.

      I bought two seedlings off TradeMe - the only place they were for sale in New Zealand (a couple of specialised nurseries mention them, but don't really sell to the public). It seems like it's impossible to buy them any larger!

      They're much easier to buy in the USA though, by the looks of things: Jabuticaba plants and seeds on Amazon

      I figured that they'll be low maintenance plants that look nice around the deck, and maybe in five years I can try getting them to fruit. (...And by "nice around the deck" I meant that I may eventually repot them into nicer pots. The plants are really lovely in person, and I say this as someone who generally doesn't care for so called ornamentals).


      Because I bought two, I can experiment with the best pot type. They like it moist, so one is in a normal plastic pot, but I also think that air pruning pots seem to be a good idea, so the other is in a DIY pot (wire basket and weed mat lining).

      Both are sitting in a plastic bowl to catch the water - the basket pot absorbs it back in a lot more readily! (Same rainwater, same amount of time, half the amount of water in the bowl).

      The reason the water is so dark is because of all the soil that washed out with the rain! (Now there's incentive to put a bowl under pots).

      More info:


      Also a quick update on two of the natives:

      The Red Kaka Beak is growing really well.

      This little manuka Huia is somewhat smothered, but absolutely covered in flowers. 
      In my defence, that ground was bare earth in summer - the winter rains (and me disturbing it) have been a massive boon for the weeds!


      99 Bottles In The Ground

      One buried milk bottle under the borage, and practically
      on top of a dwarf manuka plant.

      Behind it is an alpine strawberry and the curled parsley.
      Behind that you can just see the chives around the Blush Babe apple.

      The bottom right corner is a
      wool mulching blanket from Country Trading.co
      around the columnar Ballerina Polka. The rest of the mulch is
       pea strawand needles from the Norfolk Pine.
      I've been looking for a better way to water everything that didn't involve lots of money or digging up my entire garden (because summer is coming, and I have twice as many plants now!).

      The best quick DIY method I've found is just burying a bottle with a few tiny holes or slits in. This both acts as a slow distribution water storage tank that won't evaporate and delivers the water deeper under the ground directly to the roots.

      I haven't needed to actually test them yet, because it's still winter and rainy, but I've started adding them to bare ground, or when I plant stuff.


      Problems:

      - finding enough bottles! We generate very little recycling which is really holding up my plans for a recycled garden empire (I've been trying to do a bottle tower for ages and never have enough bottles! Also see: the incremental rate of mulching for new beds... I'm almost ready to go raid recycling piles on recycling day).

      - burying the bottles. They have to be quite deep, so it's tricky to add them around existing plants. The best time to add them is when planting something new.

      - difficult to judge the right bottle size or slit size (it always comes out much faster than expected!). I've got some much smaller ones in the containers and the bigger 2 litre bottles in the garden.

      Considerations

      - may be worth adding a filter over the opening to stop things falling in

      - may need to add sand or something similar to slow the rate of water seepage

      - could be an interesting way to disperse fertiliser directly to the plant roots (e.g. something that will dissolve like Blood and Bone or compost teas)

      - they look a bit ugly, but should be covered up by plants over time if you put them in the right place.

      - you probably need at least one per large plant or tree, so that can add up to a lot of buried bottles.

      - can just not bury them and have them slowly drip down from the surface but I like the idea of getting the water in as deeply as possible.


      More info
      http://www.providentliving.org.nz/bottle-drip-irrigation/
      http://www.chicagonow.com/chicago-garden/2009/06/pop-bottle-drip-irrigation/
      http://gardenandhome.co.za/article_t2.aspx?id=50568


      Weeds and Peas

      Just a quick picture update.

      I held off on eating all the peas for a week or two and managed to harvest a pile of them last week. The dwarf peas are definitely better than the Easy Peasy ones (I think they must be a snow pea variety, maybe) at this point in the season (I've found that the Easy Peasies just aren't as sweet now, even the new ones).


      I did promptly eat most of them after carefully shelling them.


      White Moth Vine

      Aaaand the awful moth vine that was climbing over the fence from the neighbours has been removed! It's a terrible weed, and I kept chopping it back but it just regrew. It looks like the edible choko vine, but isn't anything like it.


      Pictured: The vine shortly after being viciously cut back.

      I pulled all the pods off a few months back, when I realised what it was. They're full of fluffy seed masses that disperse widely given the chance.

      They all went into a plastic sack to rot. Once I was convinced that they were thoroughly dead, I added them to the Drowning Bin.


      One reason it's nasty is that the sap drips like milk and can cause skin irritation. It's supposed to be poisonous as well and kill things that eat it (including butterflies).


      Tradescantia

      The other main garden weed is the Tradescantia (locally known as Wandering Jew). If there is a plant that I would love never to see again, it's this one.


      It grows everywhere, sneaking through the roots and amongst the other plants, then builds up in a thick mass and smothers everything.


      But you can't just get rid of it. No. It's resistant or immune to most normal herbicides, and it grows back from practically nothing. I have found random stalks with a single leaf on still growing happily a month after I dropped it on the deck. It survives being smothered and drowned, and just starts growing on top of the bits that died. I have only managed to kill it completely after four months in the drowning bin, and I had to push down the floating mass a few times, because it kept growing.

      Luckily there isn't a lot of it, but it keeps sneaking in under the fences.


      Onion Weed

      This darned thing is taking over my lawn (especially where the ground has been disturbed). A close relative of onions, garlic and chives, it's very easy to identify by the smell. It's also edible, but as I hate the taste of the allium family, that doesn't really help.


      Here you can see the onion weed after a recent lawn mower massacre. It grows back fast, and is darker and bigger than the grass. 

      It's a bulb plant, and each bulb produces much smaller brown bulbs that get lost very easily in the soil when you dig them up. The only sure way to kill it is either very strong poisons (as it is resistant and keeps growing back), or to starve it. You starve it by repeatedly cutting it (while it tries to regrow and new bulbs pop up leaves all the time), or by mulching over it. I'm currently attempting the latter in the worst spot - which actually, isn't where I was digging the most. It was where the ground was completely bare in summer, so there is no competition from the grass.

      Strawberries. Strawberries Everywhere.

      I now have 40-50 strawberry plants in pots, hanging baskets and random containers. The varieties are Chandler, Camarosa and Red Gauntlet (though I've already started to lose track of which is which). They aren't going into the garden, because strawberries tend to take over and I haven't got the space for that. I should get a good couple of years of fruit, and then I can just repot a bunch of runners.
      I've also got a handful of random ones that sadly turned up with some sort of scorch fungus disease on. I planted them anyway, away from the others (apparently it travels through splashing water).

      WALL OF STRAWBERRIES
      This is the northern end of the house which gets
      the most sun. So that's where all the strawberries are.
      Camarosa Strawberries in cheap planters from
      nice TradeMe people
      (A really nice lady gave me the wooden one
       along with a raised bed!)
      I also started buying alpine strawberries (which are really hard to find! The odd seller on TradeMe and a couple of tiny nurseries around New Zealand). They're much less invasive, fruit all year round, and should do well tucked under the borage and the various bushes and trees, as they're much happier with shade than the bigger version. So far, I only have an unknown variety of yellow ones, but I have a mixed handful of colours on the way (nobody in NZ seems to know what variety they have!). They're also apparently easy to grow from seed, so I should be able to grow plenty more.

      From left: The Kotare Honey peach waiting to be planted
      Alpine strawberries in a colander container
      Broccoli plants in a big pot
      Chilean Guava and a spreading manuka spp. that are being grown up to a better size
      The raspberry pot (I may need to separate the two varieties for easier pruning)
      A grape and a fig (both tiny little stubs right now).

      The borage, by the way, is doing fantastically. It's huge and producing ongoing flower stalks and has been a great groundcover between two of the apples (it's sheltering the curled parsley, and I have chamomile growing under it). The comfrey in the useless soil corner isn't growing much, but you're supposed to give them a year before seriously harvesting anyway. I did scavenge a leaf to make DIY rooting hormone for some of the cuttings (which appear to  be rooting - the Myrtus ugni and the Feijoa Bambina have tiny threads poking out the end now).

      Bought three dwarf peach trees; Kotare Honey, Honey Babe and Bonanza. They should all fruit at slightly different times, but we'll see. The Bonanza is in the garden next to the apples, and the Honey Babe is in a big pot. I'm still deciding where to put the Kotare Honey.

      Yellowing leaves on the orange. It is almost certainly
      due to all the rain leaching out nitrogen from the soil or
      cold temperatures "locking up" the magnesium.
      It should bounce back again now the rains have moved on.
      I gave it a heap of grass cuttings under the mulch, and some
      blood and bone to help cheer it up.
      I'm not sure how well they'll do, as peaches as notoriously disease and pest prone, but the steady breezes around the house should keep them well free of mildew.

      My currant collection is now rather respectable: two blacks (Magnus and Sefton, I think), two reds (Gloria de Versailles and Myra Mckee) and an unknown white. I'm planting the blacks in pots (as they spread) and the others along the fenceline out the back, behind the guava and feijoas and in the shady bits.

      One of the grapevines (the seedless Candice) has gone in behind the apples and the peach - it should grow up over the edge of the deck, where it can be easily pruned and kept at a manageable size.

      I'm also eyeing blueberry and papaya seeds; both should be easy to grow in containers and produce decent amounts of fruit. I want a Southern highbush variety of blueberry, because they're smaller than the rabbiteye and do well in the Auckland region. I'm looking at seeds because it's a lot cheaper than buying actual plants and it means that I don't need to find space right away (I need to stock up on giant pots as it is!).

      The peas are starting to go a  bit weird now. They're still producing, but the pods are usually a bit discoloured. The two weeks of rain probably doesn't help - it's also been pretty bad for the citrus. My Meyer lemon and the orange have been looking a bit yellow around the edges due to the constant watering.

      On the citrus front, I also picked up a Sublime lime - a container sized variety of key lime that apparently does very well in pots. The Meyer lemon has started flowering properly.
      The tiny Sublime lime in one of the makeshift
      air pruning pots (i.e. a metal wastepaper bin and
      weed matting liner)
      The first Meyer lemon buds have opened
      (also note the yellow tinge on the
      leaves from the rain)
      The heritage raspberries that were produced in late autumn withered away and died over the last month, so I pruned away the rest of the stalk. There's plenty of new growth showing around the roots.
      The more sensitive deciduous trees, the pears and the cherry, have all dropped all their leaves now. The little almond has dropped most of them. The others are doing fine; a few yellow leaves on the apples, and nothing else. The banana has just unfolded its eighth big, beautiful leaf.

      And the broccoli has started to flower! Tiny little broccoli heads are showing on the ones planted out first into the garden and the ones in the white container (I was a bit worried about them as they need a lot of space, but the three survivors are doing really well).

      The first broccoli flower. 

      Comparison with Cat for size (I never could quite tell how big the
      plants were going to get from the internet)

      Three big happy broccoli plants in another makeshift container.
      One has a flowerbud. There used to be more, but they crowded out the weaker seedlings,
      which is fine as I had too many from the start.

      I've started a seedling collection indoors, trying to get some tomatoes, melons and cucumbers started. The beetroot and the stevia have actually sprouted, so I'm crossing my fingers for the rest. I also found some neat carrots - Paris Market carrots - which are basically like orange radishes. They're great for containers and bad soil because they just don't need to grow much.

      And I've also torn out that darn spider plant that the previous owners left. It has a massive root mass of weird tubers! It's gone into the drowning bin, where all the invasive weeds go. The bin is now full of dark brown, stinking, liquid and half rotted vegetation, and should be pretty awesome fertiliser. I've been trying to dig out or smother the onion weed that has sprouted all around the garden as well. I'm throwing cardboard down and starting the slow process of creating a new bed in the worst patch (currently it's all being held down by pots. I have some plants to go there eventually, like lavender and thyme, but they're all so tiny right now that they'll be overrun by weeds as soon as I turn my back. I'm growing up a few things in pots and then will see what fits there).